Engagement Menu
The Engagement Menu (EM) widget (formally known as Conversion Menu) surfaces a suite of ever present "sticky icons" that represent a variety of call-to-actions (call now, email now, get directions, etc) on mobile, desktop, and tablet views.
This training is for adding the EM to an already built website.
- Call Action / Call Us
- SMS Text Action / Text Us
- Reviews
- Link Action / Request _______ or other internal page link or 3rd party link beginning with Pay Now
- Facebook Messenger Action / Message us
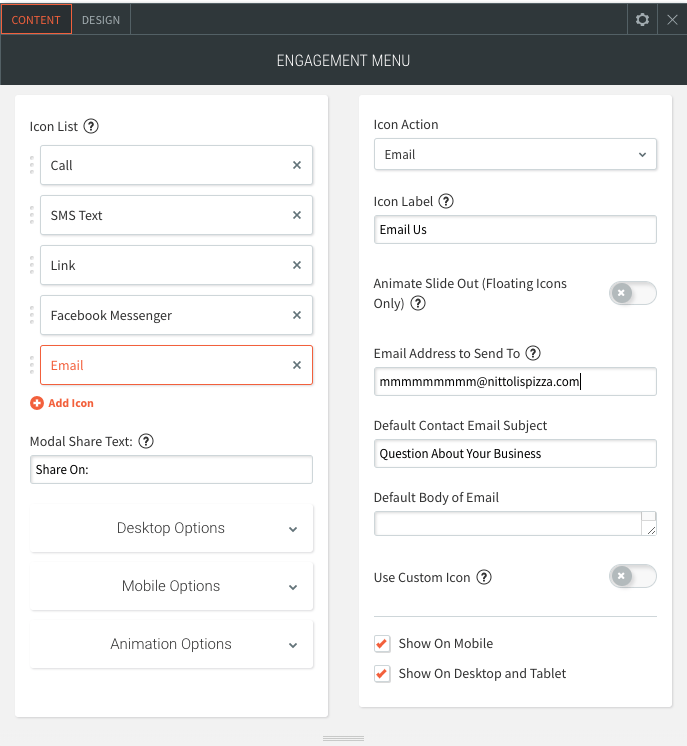
- Email Action / Email Us
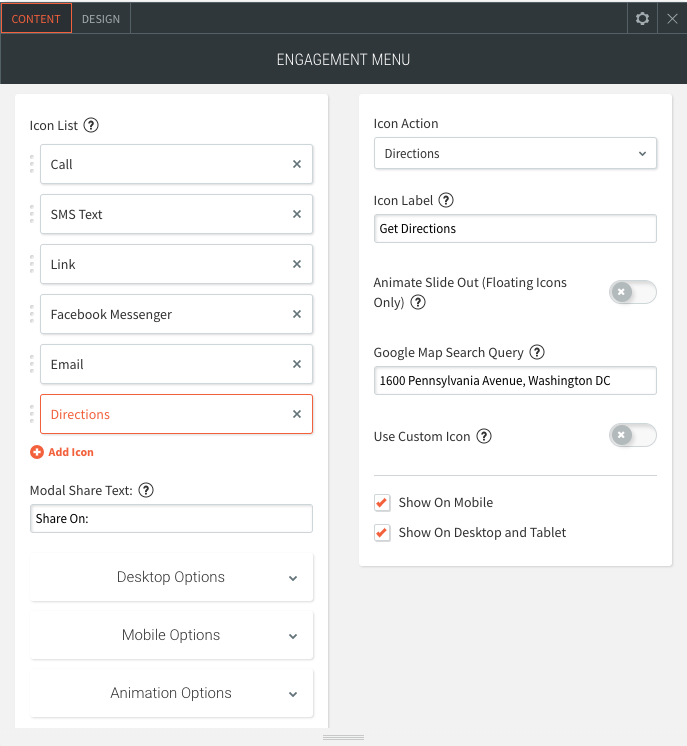
- Get Directions Action / Get Directions
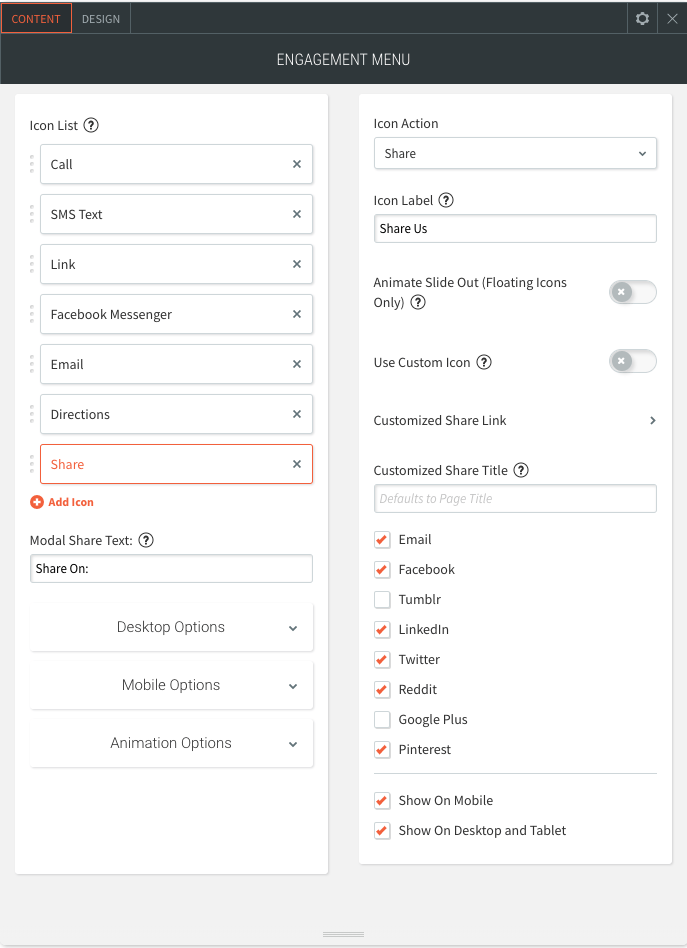
- Share Action / Share Us
STEP ONE: BACKUP WEBSITE
- Backup website following process guidelines.

STEP TWO: ADD WIDGET TO WEBSITE
- Scroll to bottom / footer
- Open widget tab from sidebar
- Locate Engagement Menu widget and drag to bottom left corner of site and place directly under first column content

STEP THREE: CALL
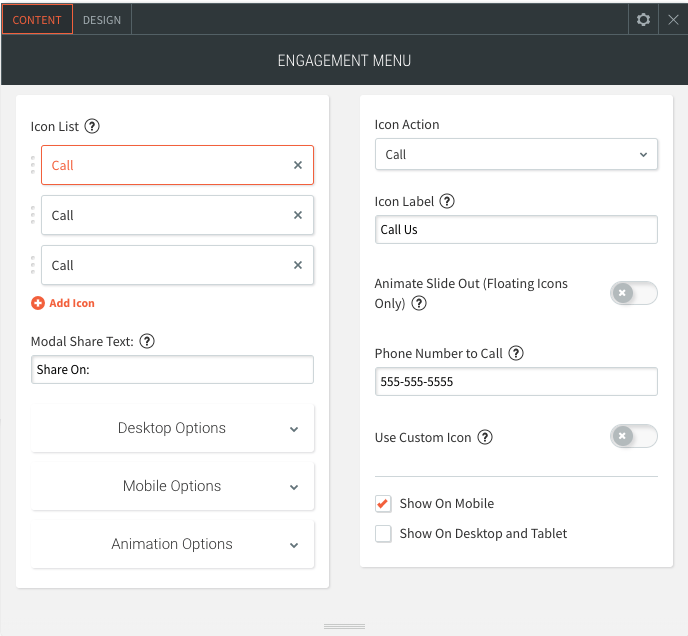
- Inside widget click first option under Icon List, "Call"
- Confirm Icon Action displays "Call"
- Confirm Icon Label displays "Call Us"
- Enter business landline phone number
in the Phone Number to Call field
- Enter number per process format guidelines
- Do not enter vanity number
- Note, this field will not auto-populate from business info
- You are permitted to enter an RCF number in place of business landline.
- Leave Use Custom Icon switch In off position
- Confirm Show On Mobile is on
- Confirm Show Desktop and Tablet is off
STEP FOUR: SMS TEXT (if applicable)
- Under Icon List click second option, "Call"
- Under Icon Action and select "SMS Text"
- Enter "Text Us" in Icon Label field
- Enter business mobile number in the Phone Number to Call field and NOT the provisioned RCF
- Enter business number per process format guidelines
- Do not enter vanity number
- Texting function will only work with mobile number
- Leave Use Custom Icon switch In off position
- Confirm Show On Mobile is on
- Confirm Show Desktop and Tablet is off

STEP FIVE: LINK (Reviews) (if applicable)
- Add Link option
- Enter "Read Reviews" in Icon Label field
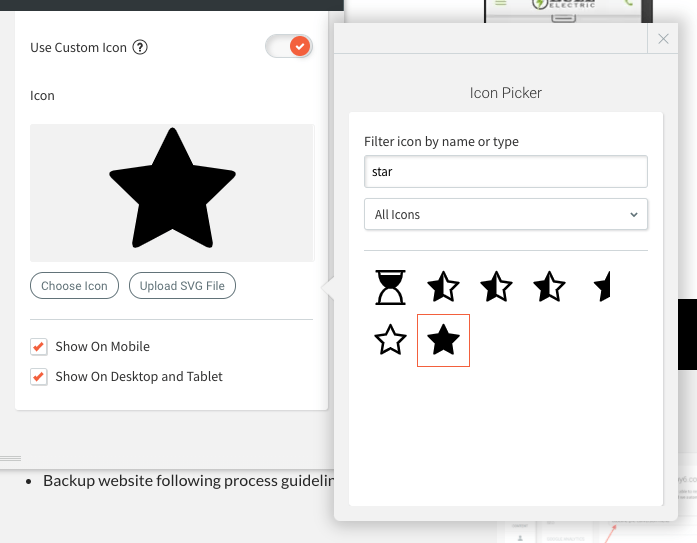
- Switch Custom Icon switch to on position
- Scroll down and select Choose Icon
- Search for an "star" icon.
- Select last star option (filled in star)
- Link to Reviews (or Testimonials if Reviews is not present) pg
- Confirm Show On Mobile is on
- Confirm Show Desktop and Tablet is on
STEP SIX: LINK (aka Request ______) (if applicable)
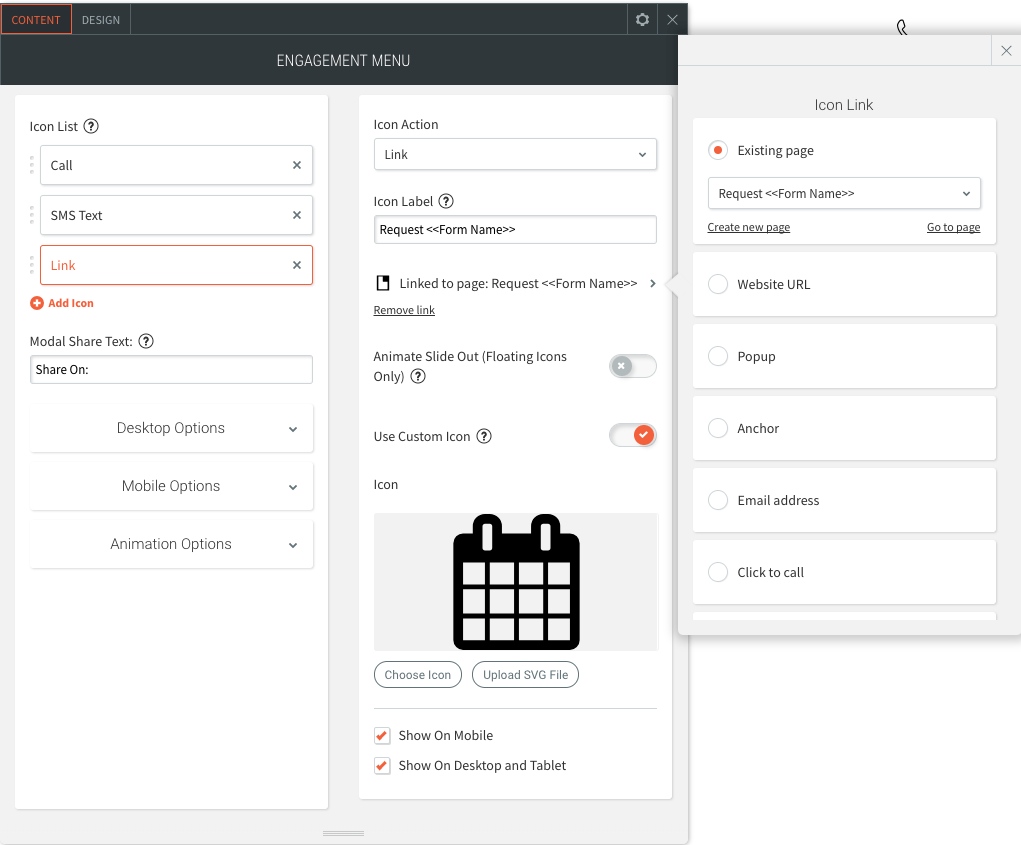
- Under Icon List click third option, "Call"
- Under Icon Action and select "Link"
- In the Icon Label field enter the form name
- Request Estimate
- Request Service
- Request Case Review
- Etc.
- Switch Custom Icon switch to on position
- Scroll down and select Choose Icon
- Search for an icon to display that best represents the action
- Clip board w/calculator for Request Estimate
- For Request Service choose a wrench or some other tool or device representitive to the service
- Choose a brief case or some law related icon for Request Case Review
- Etc.
- Link to Request _____ page
- Confirm Show On Mobile is on
- Confirm Show Desktop and Tablet is on
STEP SEVEN: FACEBOOK MESSENGER (if applicable)
- Under Icon List click "Add Icon" (located under newly add Link)
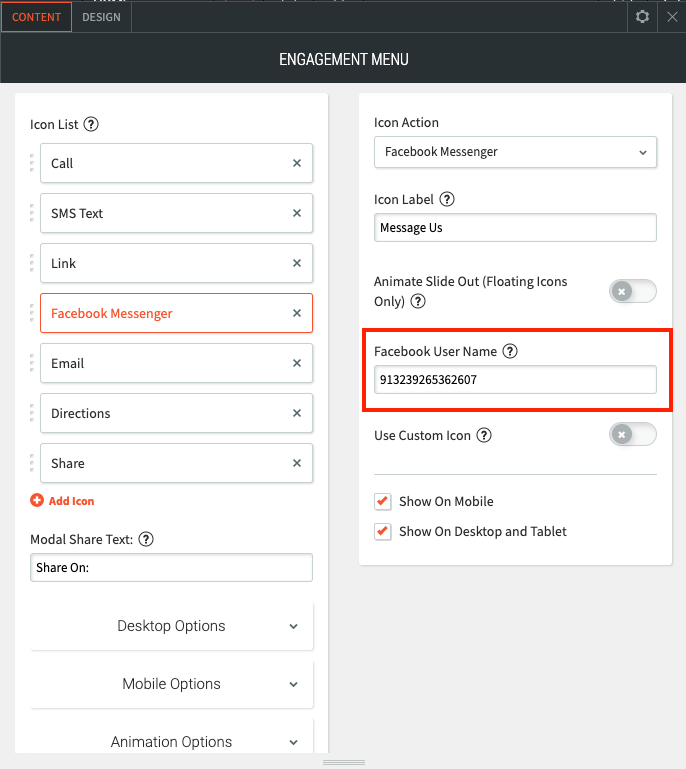
- Click "Call" under Icon Action and select "Facebook Messenger"
- This will auto update Icon List option to display
"Facebook Messenger" - Enter "Message Us" in Icon Label field
- Enter Facebook Facebook Business ID
- Leave Use Custom Icon switch In off position
- Confirm Show On Mobile is on
- Confirm Show Desktop and Tablet is on
STEP EIGHT: EMAIL (if applicable)
- Under Icon List click "Add Icon" (located under newly added Facebook Messenger)
- Click "Call" under Icon Action and select "Email"
- This will auto update Icon List option to display "Email"
- Enter "Email Us" in Icon Label field
- Enter business email address in the Email Address to
Send To field - Note, this field will not auto populate from business info
- The Default Contact Email Subject will be pre-populated with "Questions About Your Business." Leave as is.
- The client may request to have this subject line edited or deleted.
- Leave Use Custom Icon switch In off position
- Confirm Show On Mobile is on
- Confirm Show Desktop and Table is on
STEP NINE: DIRECTIONS (if applicable)
- Under Icon List click Add Icon (located under newly added Email)
- Click "Call" under Icon Action and select "Directions"
- This will auto update Icon List option to display "Directions"
- Enter "Get Directions" in Icon Label field
- Enter complete business address in the Google Map Search Query field
- i.e. 2201 Renaissance Blvd, King of Prussia, PA 19406
- Note, this field will not auto populate from business info
- Function will only work with physical address.
- Do not enter serving area, individual geo (towns, cities, zip codes, counties, states, etc)
- Leave Use Custom Icon switch In off position
- Confirm Show On Mobile is on
- Confirm Show Desktop and Table is on
STEP TEN: SHARE
- Under Icon List click Add Icon (located under newly added Directions)
- Click "Call" under Icon Action and select "Share"
- This will auto update Icon List option to display "Share"
- Enter "Share Us" in Icon Label field
- Switch Custom Icon switch In on position
- Scroll down and select Choose Icon
- Enter "Share" in Filter icon by name or type field
- Select the second icon (three black dots on white background)
- Leave Use Custom Icon switch In off position
- Verify all share options are except for Google Plus
- Confirm Show On Mobile is on
- Confirm Show Desktop and Table is on
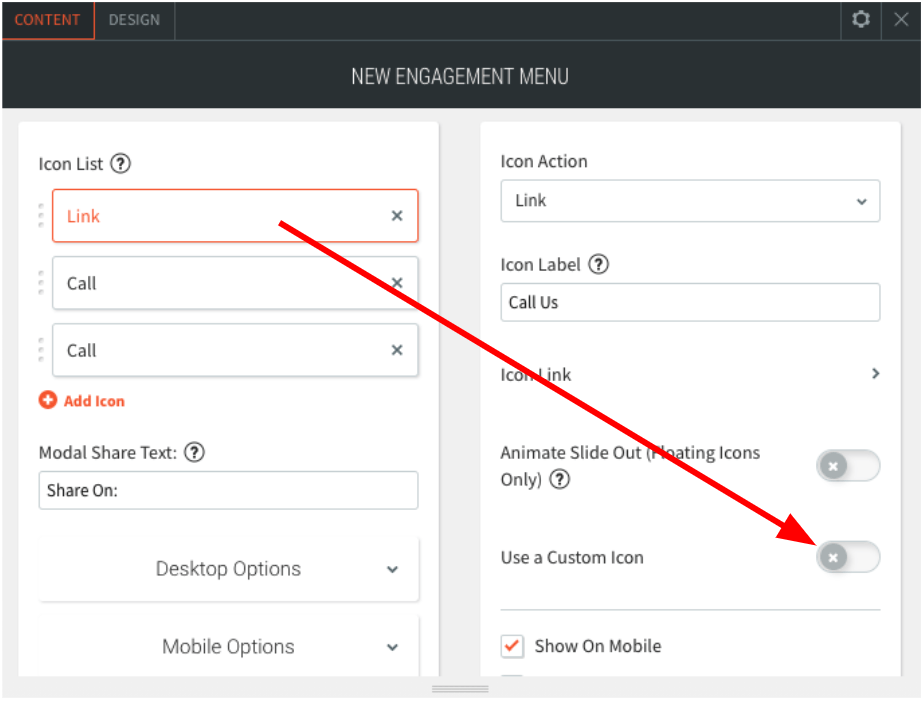
STEP ELEVEN: ADD ADDITIONAL LINK ACTION (if applicable)
- Under Icon List click Add Icon (located under newly added Directions)
- Click "Call" under Icon Action and select "Link"
- This will auto update Icon List option to display "Link"
- In the Icon Label field enter the call-to-action associated with link
- Enter "View Menu" and link to existing menu page
- Enter "Make Payment" and link to 3rd Website URL
- Enter "Request Service" and link to popup form or anchor to form created specific to requesting a service
- Note, given that Appointments requires different action links for desktop/tablet vs mobile, we cannot include it in the Engagement Menu at this time.
- Etc.
- Switch Use Custom Icon switch to on position
- Select Custom Icon 1
- Switch to left panel and scroll down to Custom Icon Options
- Select Choose Icon button underneath green circle with 1 icon
- Scroll down and select Choose Icon
- Search for an icon to display that best represents the action
- Knife and fork icon for "View Menu"
- Dollar icon for "Make Payment
- Calendar icon for "Request Service"
- Select Design and scrool to Custom Icon to adjust size indivudually.
- Repeat steps to add additional custom icons

- Under Icon List click Add Icon (located under newly added Directions)
- Click "Call" under Icon Action and select "Link"
- This will auto update Icon List option to display "Link"
- In the Icon Label field enter the call-to-action associated with link
- Enter "View Menu" and link to existing menu page
- Enter "Make Payment" and link to 3rd Website URL
- Enter "Request Service" and link to popup form or anchor to form created specific to requesting a service
- Note, given that Appointments requires different action links for desktop/tablet vs mobile, we cannot include it in the Engagement Menu at this time.
- Etc.
- Switch Use Custom Icon to on position
- Select Custom Icon 1
- Switch to left panel and scroll down to Custom Icon Options
- Select Choose Icon button underneath green circle with 1 icon
- Scroll down and select Choose Icon
- Search for an icon to display that best represents the action
- Knife and fork icon for "View Menu"
- Dollar icon for "Make Payment
- Calendar icon for "Request Service"
- Select Design and scrool to Custom Icon to adjust size indivudually.
- Repeat steps to add additional custom icons
- Confirm Show On Mobile is on
- Confirm Show Desktop and Tablet is on
- Position link action top to display directly under Call / SMS or Request ______ link.
- Note: Writer / Build teams may add one (1) additional link if deemed appropriate or requested (coupon, gallery, faq, page).
- Position directly existing Links Actions.


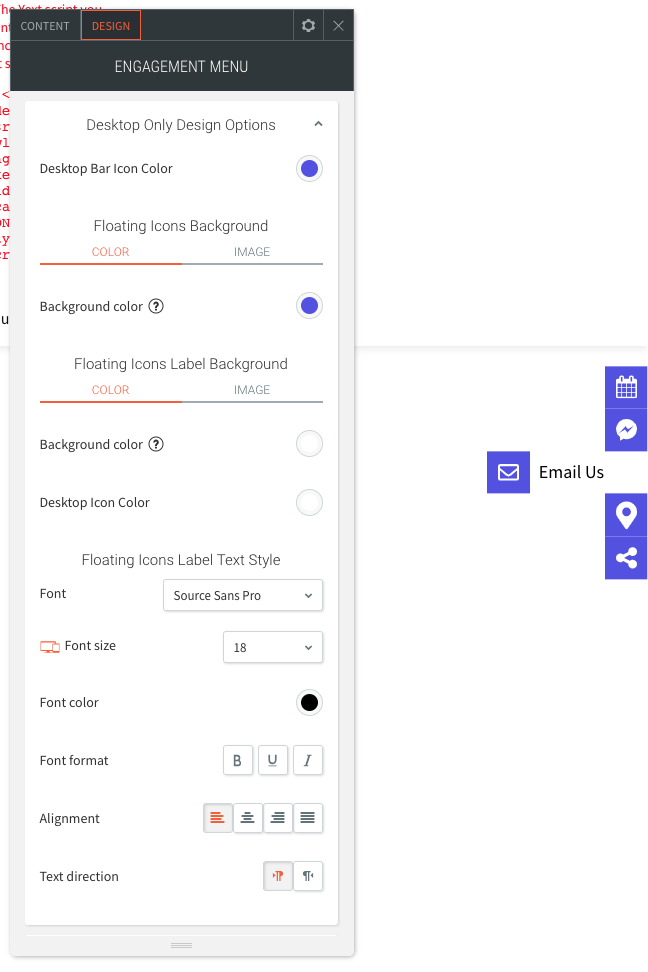
DESKTOP DESIGN & DISPLAY
- Select widget Design tab
- Expand Desktop Only Design Options
- Icons should be displayed with solid dark color (preferably one that matches site palette)_with white icon. Once expanded, content should be displayed with black font on white background
- Roll over icons to confirm Icon Label (i.e. Get Directions, Call Us, etc) is complete and not truncated
- Icon Labels with too many characters will not display completely
- Ideally the Icon Label should be short, but if the Link Icon Label is too long then adjust the Font Size to accommodate length. This is a last resort option as "20" is the preferred font size.
- Font color should be black or match icon background color.
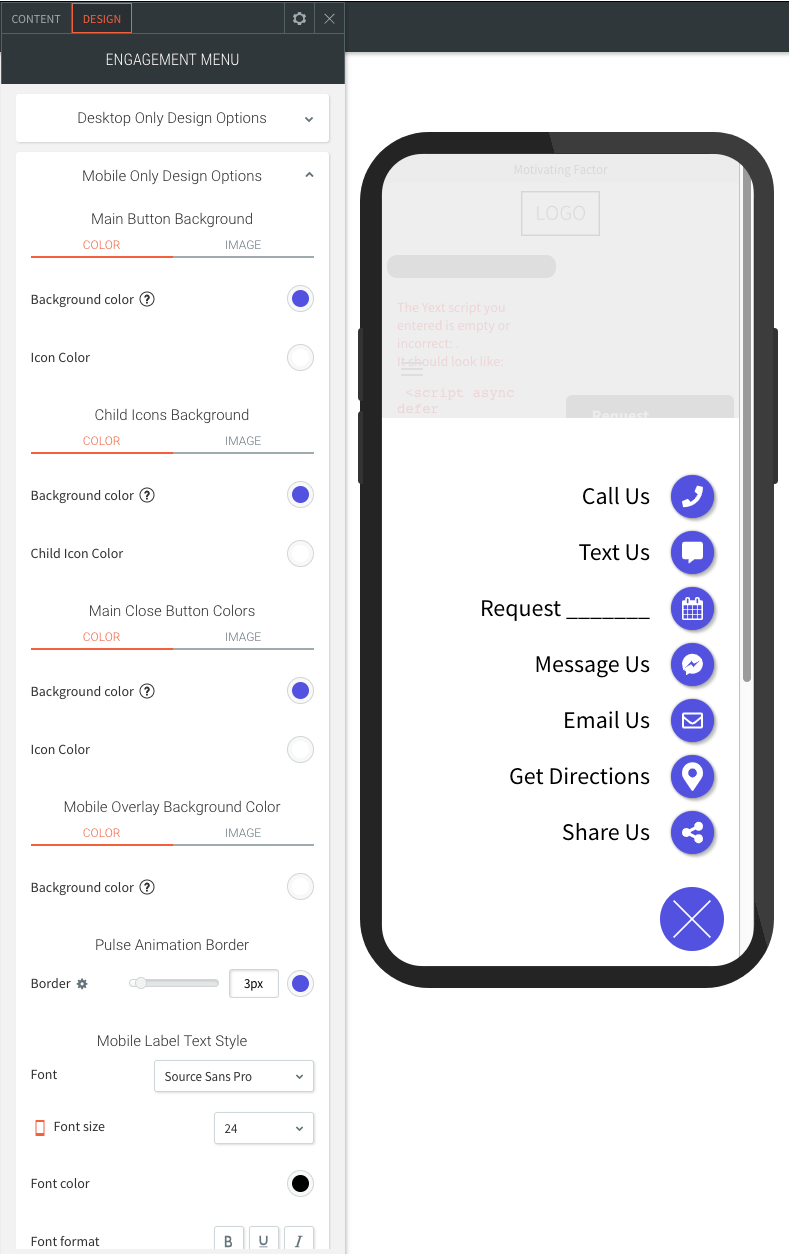
MOBILE DISPLAY
- Select Mobile View & Edit tab, located at top of editor
- Double click right bottom circle to relaunch Engagement Menu widget
- Click circle, again, to view call to action text and icons (aka full overlay screen)
- Confirm text is complete and not truncated
- If compromised
- Select widget Design tab
- Expand Mobile Only Design Options
- Scroll down to Mobile Label Text Style to adjust Font size
- Icon background color, icon color, open / close circle, and font should match desktop colors.
- Font size may differ, however.
Share On: